All posts by Patti O'Brien Beaumont

Dyeing Multicolored Locks

20160414_111100  On Saturday, I’ll be at the Fiber Frolic at Beaver Lake Nature Center, demonstrating spinning and doing a variety of things fiber-y for people’s entertainment.

The Golden Fleece Spinners Society will have a story loom for public use.  It’s lots of fun, so come and add a few rows. You can use these  Leicester locks  which I’m dyeing today to add some colorful texture.


Thanks to Heather at Lochan Mor Farms for donating fiber for demonstrations! 20160414_140116

These are gorgeous locks.  They are bright white with creamy tips and a firm structure. Dyeing multicolored locks is all about the wide bottomed pot and leaving the locks alone while the dye does its thing.

Directions:
Fill the bottom of your pot with a few inches of water and add citric acid.  Pre-acidifying the water will make the color strike quickly.  This means that some areas are going to take up more dye than others.

Put locks in and let them soak for at least 30 minutes.

When you are ready to dye, add just enough water to keep the locks wet, not enough so that they are floating freely.   Sprinkle dye powder in a few places and use a wooden skewer to gently spread the locks a bit and disperse the dye without sending it over into the other areas of the pot.  You can also add concentrated liquid dye.  I find the powder gives a better color variation.

Then, put in the temperature probe set to 180F, turn on medium heat and walk away until the probe beeps.
temp probe

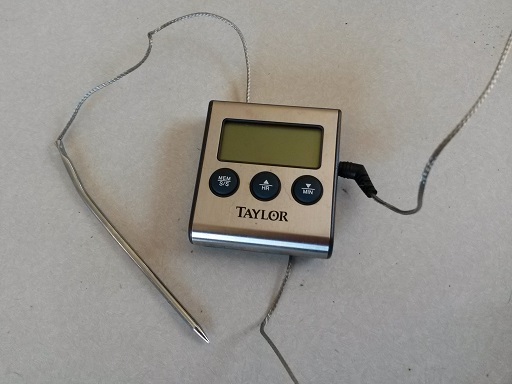
Here’s the spot in the process where I made a mistake.  I was trying to do 27 things at once.  I forgot to add the handy dandy temperature warning probe which is my solution to trying to multitask.   The probe works by setting a goal temp- in this case 180F.  The probe hangs out in the pot and when the temp reaches 180, the base starts beeping.

Lots of people dye without using the probe.  You can just watch and wait until the pot almost comes to a boil and then turn down the heat.  I know myself better than that.

Normally,  the probe beeps, I catch the water before it boils, turn the heat down to low, and let the fiber sit in the hot, acidified water until

1) It reaches the color I would like,
2) the dye is exhausted & the water is clear or slightly milky, or
3) the fiber has absorbed all of the dye it is going to take.

It depends on the dye and the fiber, but that takes about 30-45 minutes- sometimes longer for a very saturated color.  If the dye isn’t exhausting, you can try adding more citric acid.  Or you may have used too much dye.  *Or* it may need to cool down for the last of the dye to take.

Here’s the important part.  After simmering, turn off the heat and walk away until the water cools to room temperature.  If you need to reinforcement, set the temperature probe for 70 degrees and don’t touch until the probe give you permission.

Really.  Don’t touch it.  Every time you poke at it, you will start to open up the locks and either risk felting or ruin the lock structure.

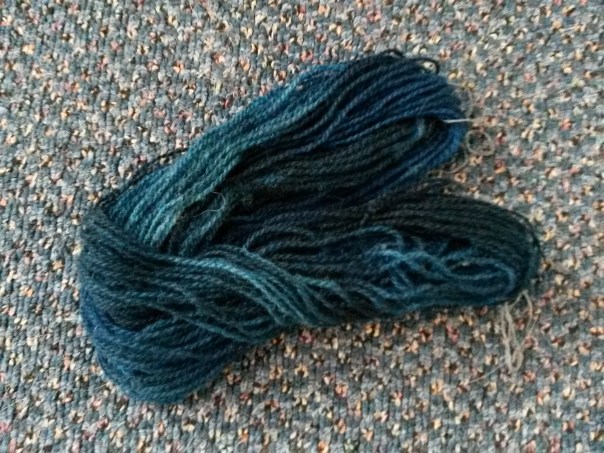
Today, touching the cooling locks was not my problem.  I forgot the probe but walked away waiting for the beep.  This pot went to boil.  Whoops!  These locks are pretty resilient.  It was tempting to start pulling on the fiber to see if it had felted.  I was surprisingly good about it.   I pulled the pot off the burner and walked away. (that’s unusual for me.  I’m a prodder)   Once it cooled, I was able to rinse thoroughly and get a rough idea of how things look.

20160414_123959.jpgThe saying is, “It isn’t felted until it is dry.”   I’ll also add to that, “You don’t know the color until it dries.”   In this case, everything still feels nice and loose. The colors are bright and have a nice variegated look.  There may be some spots that are felted.  Felting happens with heat and agitation.  The boiling of the water was definitely adding agitation, so I’ll find out tomorrow if there are any sections that are locked up. If I start pulling on the locks today, I risk making any felting worse.  So, it’s out in the sun with a kitty for company.   The cat isn’t crazy about cold, wet wool in her sunbeam, but she’s agreed to share.

It’s all about the base

 I grew up surrounded by women who sewed needlepoint, esp. canvases inspired by tapestries.  In needlepoint, the artist hand blends single plies of different color yarn and thread before stitching and then interlaces the colors on the canvas so that the eye blends them to create incredible depth & complexity.  In spinning, I do something similar by hand-blending roving and layering the plies.  In dyeing, it’s a totally different feel.  Hand-painting is the best way I’ve found to get complex colors, and I’m working on painting subtle yarn that will create the same feel when knitted as the complex colorwork in historic needlework.

Right now, it’s all about red.  Rose red, tiger lily red, hibiscus red.

reds sheilas gold base


Red can go so many different ways from barn red to slinky red dress.  So many possibilities, but also so many beautiful reds already being made by other dyers.

I’m developing the color below: Tiger Lily Red.  cropped tiger lily

It’s a true red with hints of orange red, red-pink, and some brown & gold tints throughout. This is on a superwash merino/nylon base.  It looks very earthy and floral rather than 50’s lipstick.  That’s the goal.  This base isn’t the best choice for the color I am after.  It’s a wonderful yarn that takes color easily and makes a bright, in your face yarn.  I’m trying for something a bit more mellow with the Tiger Lily.

Next up, trying it on shetland and on a camel/merino blend.   I also plan to spin up some targhee/alpaca roving that is a gorgeous light grey & brown.  The warm undertones of the handspun will add a nice depth to the finished colors.


Spinning for Stress Relief

20150706_001102Some days spinning is very upbeat.  I put on happy music, pick bright colors and shake off the funk of a crummy week.  Other days, it’s meditative.  No need for music.  The wheel and spindle make their own sounds to pair up with the feel of the fiber moving across my hands.  My thoughts drop away, and I am completely absorbed in the act of watching the yarn appear .

Spinning is incredibly cool on so many levels.  Each time I take out some fiber and a spindle, it hits me.  I’m about to play with something amazing that came from a living thing- a sheep, an alpaca, a cotton plant.  Magical things will happen in the interplay between with my fingers and the fibers, and at the end of it, I have beautiful yarn to play with!   I also know that while I spin, I will shake off all sorts of ugly thoughts and baggage that I’ve been carrying around during the day.  I’ll replace the yuck with the smell of the fiber, the look of the colors coming together, the sound of the wheel or spindle, and the feel of the fiber moving over my fingers.

My breathing will fall into sync with the rhythm of spinning.  On one level, the world becomes very small and immediate. While I spin, I’m apart from the million little thoughts pecking at me during the day.  On another level, I become a part of the long tradition and history of fiber arts that is at the core of societal development. I feel a tie not just to the people who have developed the craft but to the community of people who continue to find new ways to express themselves through fiber.

When I step away from the wheel, I take that feeling of peace and connectedness into the rest of my day.

Fiber: Malabrigo Nube Piedras
Spindle:  Turkish Spindle from Snyder Spindles


Thin Yarn, Consistency and Gauge

New spinners fixate on thin yarn.  After making super thick, slubby yarn, thin yarn looks like the sign of an expert spinner, a person with mad skills and precision control!

Actually, thin yarn isn’t the big spinning challenge.  Variation in wraps per inch & twists per inch show more in a worsted weight single  than in a laceweight single.  No one type of yarn stands out over another.  For me, a spinning rockstar can spin exactly what he or she wants within the limits of the fiber type.

I started spinning with a spindle like a boat anchor, a small bag of dense, lightly felted roving, and a thin book called Hands On Spinning.  The information in the book WASN’T working for me.  It is an excellent book, and I highly recommend it if you are someone who follows directions.  It asks you to start out hand twisting a little piece of string.  I spent about 20 seconds on that & then jumped straight to the ‘flick that spindle’ part.  I wanted to spin, not hand twist fiber.

It didn’t click for me that the act of making yarn took place between my hands, not in the spindle or the wheel.    I kept thinking- ah, I need a different spindle.  And, if only I had a wheel.

I didn’t need a wheel or a different spindle.  I needed to concentrate on learning how to manage fiber.  There were tears.  Lots of frustration.  I learned to get the basics of drafting going by micromanaging my fiber supply.  I could flick my spindle with the best of them & have enough twist for yards and yards of drafting.  My hands stayed glued together and did a fair amount of double drafting and fiber play to get a consistent yarn.  Eventually, it was thin, consistent yarn!  But it was rock hard.  Over spun, over handled.  Lifeless.20160307_124126

To fix that, I taught myself all sorts of coping mechanisms to adapt for what was really a fundamental error in my technique. I added a cool little roll to take the extra twist out of the fiber.  I predrafted like a demon.  All good techniques to know, but not things I should have relied on to spin a basic single ply yarn.  I didn’t care. I was spinning- a slow, tortured spinning process- but look, I could make soft and pretty yarn.

Eventually, I found a guild and saw other people spin.  What they did looked so relaxing! They just sat there with some fiber in their hands, did a little hand wiggling, and yarn appeared.  It was magic!

I started over, but I had lots of bad habits to unlearn.

If I am micromanaging my fiber, I remind myself to separate my hands and to check the length of my fiber staple.

I check to make sure that I am not over-tensioning the fiber supply with my fourth and fifth fingers.  I’m a knitter and instinctively grab onto the fiber with those fingers.  I try to remember the baby bird image (“hold your fiber like you are cradling a baby bird”).  But in the end, what works best for me is envisioning the fiber sliding off of my fingers like water running over rocks.

 See the post on drafting for more about this

To keep the yarn consistent, I tape a little sample to my wheel.  It sits right in my line of 20160307_134924sight, reminding me of the goal.  Every once in a while, I pull my yarn over to the sample and do a spot check.  Then I check to make sure that I am keeping the density of the yarn the same.  I can match the singles width, but the amount of fiber in that single will vary.  (see upcoming post on Grist) This shows up when I ply, so I fold back the yarn on itself to make sure the plied yarn matches as well.

And last but not least,  I have a control card for spot checks to make sure I am not drifting from the overall plan (assuming there is a plan!)
To use the card, I lay the single in the groove to get an estimate of the wraps per inch.  This is pretty cool, so I will do a post just on control cards soon.
20150629_111721

Wheel: Schacht Matchless Single Treadle
Fiber: Story Spun Yarns hand dyed merino roving, Very Blue
Tools:  Control Card: Rosie’s Precision Spinning Control Card


Bagels, Burns, and Bandages

lipstick smaller
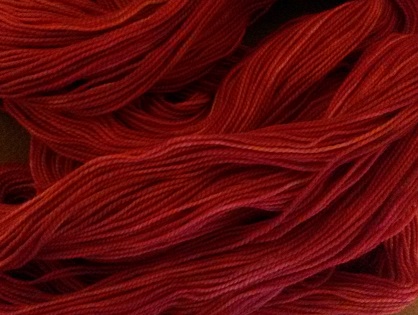
Ah, the glamorous life of the indie fiber artist.  I had scheduled a week for making videos about fiber and spinning.  It wasn’t to be.  No one wants to see pictures of my chopped up thumb or my burned hand.  Instead, here’s a picture of some lipstick pink and red yarn I spun up doing demonstrations at a farmers market.  Trust me.  This is better.

Turns out, injuries multiply.  First, I chopped my thumb while cutting a bagel.  In an attempt to do everyday tasks and *not* hurt the injured thumb, I’ve dropped a crock pot on my head, burned the back of my other hand, and suffered a variety of slings and arrows which sent me whimpering to my couch- where I discovered that I instinctively use my thumb to turn pages on my kindle.

The worst part of this is that for two weeks well-meaning people have given me tips and hints for cutting a bagel.  Trust me.  I can cut a bagel.  This was not the fault of the bagel. It could have been a piece of fish on the cutting board.  This was all me not practicing good knife skills.

We live for our bread machine, and our incredibly sharp, serrated bread knife and I are (were) best friends.  My hubby and I were joking around, and I turned to face him while making a decisive cut to sever that last bit of bagel crust.

Yup.  Insert blood, guts and gore here.  The bit of thumb on the cutting board wasn’t going back on. Very fitting that we had just seen a production of Sweeney Todd the day before.  Not a fan of meat pies, but I was strangely reluctant to throw it away.

20160223_162244.jpgThe past two weeks could have been called “painfully discovering 101 tasks that need two thumbs”.  If ever a time for armpit knitting, this was it.  Sadly, I don’t have super long needles!

In case you ever need it, here’s an alternate knitting grip.  This is my sad attempt to finish the octopus sweater (aka St Brigid by Alice Starmore).  Yes, Octopus sweater. That’s a story for another day.
20160227_192320Life did not cooperate!.  I had no luck opening jars, tying my shoes or zipping anything. I stupidly forced my swollen bandaged thumb into a pair of mittens and then got stuck. More disturbing, I developed a phobia regarding the knife involved.  Here’s the psycho knife.  I am convinced it has a taste for my blood.  From this day forward, it is Bob’s job to pre-slice all bagels that enter the house!

As I type this, I’ve just realized having a bagel boy isn’t a bad thing…  hmm.  Next step is to figure out a way to get the vacuum cleaner to attack me.

On the plus side, I did have some enforced down time.  I taped an enormous wad of gauze over my thumb and read The Paper Magician trilogy by Charlie Holmberg.   The short review: It’s charming!  Nicely written with a clear, interesting world building, good characterizations and an interesting plot.   Long review will come later.

Spring, please!

Most years, I love winter.  I love curling up under a quilt with a dog or two in my lap. Wearing thick, cuddly sweaters while drinking hot cider.  Coming in from snowshoeing and toasting my backside in front of the fire. I even like shoveling snow.

This winter has been awful.  It’s been burn-your-face cold alternating with  help, I’m trapped to the hip in salty slush-sand.

Yesterday, as it rained on the nice fresh snow again, my mood went from simple “let me play with the colors of nature to find Mary Oliver’s color”  to “hey, I have an idea for a Latin American garden”  to full-on gardenfest.  Geranium pinks, hydrangea purples and blues,  emerging bulb greens.  If I can’t have fun snow, then I’m ready for Spring!

20160221_100039
The garden skeins are fun and fairly simple to do.  The greens were layered emerald green, kelly green and a bit of turquoise blended for variation.  I laid turquoise blue, violet and pink stripes in between the green sections and let the colors bleed.  I did some skeins with the color stripes reversing (green, purple, pink, purple, green)  and some with repeats (green, blue, violet, pink, green).  I didn’t have a pattern in mind for this, so I went for a shortish repeat that would make a nice color pattern on a basic sock.

I did get a little development work done.  I don’t know where this one will end up.  It’s quiet and soft without being muted. The base is a mill spun 80% merino/ 20% camel fingering yarn with a lovely natural camel-y color.  I love working with tan bases because you just know up front it’s going to be an earthy skein.
20160221_093043

I pressed the skein into a thin sheet and used a syringe and my fingers to paint a watercolor across the yarn canvas.

I did end up wrapping and steaming this one, but for these watercolor painted skeins, I should set up a steamer tray that will keep the canvas flat.  In this case, the color mixing worked nicely.  I used some ruby red which made a nice burgundy wine when blended.  By the square inch, this is fairly balanced across the colors, but the turquoise definitely pulls everything together and stands out.

Even accounting for wet/dry color variation, I lost much more of the color than I was expecting.  I was going for Marquez- Hundred Years of Solitude.  Instead, it’s very English garden.   Still, a good first step.  I like the English garden look, so yea for that.  Best of all, I have a much better idea of the colors and saturation required for the Marquez painting.  Now I have to figure out how get it on the yarn!


Life Rafts & Mary Oliver

bamboo-870219_640Imagine your ship is sinking.  You only have a few moments to take action.  You can see an island just a short distance away, but it’ll be years until you are rescued.  Who would you want with you on that raft?  What supplies? And in my case, which books?  Books are up there with food, water, shelter.

Dream Work by Mary Oliver would be safely wrapped in a plastic case and bungee-corded to the raft right next to the fishing gear and the knives.

The rhythms of her poems recenter me.  She paints beautiful scenes that draw out thoughts tamped down by day to day life.  Picking a set of colors feels impossible.  Her work is full of nature imagery and moves from wide, open grand scale colors to a single shade.

I couldn’t begin to review her work other than to say it is awe inspiring.  Read it.

The best part of preparing to test-dye for a poet is rereading the work.  If you aren’t familiar with Mary Oliver, here are some links to get you started:

http://www.poetryfoundation.org/bio/mary-oliver
http://www.poetryfoundation.org/bio/mary-oliver#about

Peter Kagan and the Wind


In my heart, I’ll call this yarn Peter Kagan & the Wind, but considering that name is already taken, here is North Sea on shetland wool. I find shetland challenging to dye because the damp yarn has a halo  ( aka fuzz ) makes it hard to tell what the final color will look like when dry.   This is about 70% dry and coming up much more nicely than I deserve considering that I was seat of the pantsing things.

20160212_123523

These were snow dyed using less snow that I should have.  I added a 1/4 c of water part way through.    The next time I do this, I will pack the snow more firmly or add ice cubes to the snow to get that extra bit of water.

The dyeing technique was very straightforward.  I soaked the yarn for a long while in water with vinegar.  Then I put the yarn in a turkey roasting pan and filled the pan with snow.  I sprinkled green, blue, black and silver dyes lightly over the snow.  I spread the silver evenly, then put blue and green pockets and a few areas of black.  On top, I spread another layer of silver. In all, I used about 1.5 teaspoons of dye split across 6 different colors.  About 40 minutes in, I was running low on moisture in the pan, so I added a 1/4 c. water.  I also sprinkled a bit of water on the bare areas to increase the dye wicking into the drier fiber. For the last 10 minutes of dyeing, I rocked the pan and washed all of the yarn in the blended dyes to do a quick overdye.

I don’t time how long the yarn takes to cook anymore.  I put the oven temperature at 300 degrees, cover the pan with foil and then leave it until my temperature probe hits the desired number.  Once it hits the goal temperature, I drop the temperature to 225-250F depending upon the goal temperature and leave it alone.

I brought this yarn up to 180F with hopes of separating the black.  I probably should have gone up to 200, but I did get the look I wanted.  The black broke into blue and a very dark green in places.

Once I had the yarn up to temperature and the oven reset to 225F, I cooked the yarn for 15- 20 minutes with the internal yarn temp hanging out around 170ish.  Then I did the 10 minute overdye by rocking the pan and adding a bit more water and letting it cook for another 10 minutes.  After that, I poured off the excess dye because I didn’t want the overdye to wash out the snow effect.

I let the yarn rest in the sink.  When it cooled, I rinsed out the excess dye and hung the skeins to dry.

Which lasted for about 10 minutes when I started playing with them, looking at the colors.  Waiting for yarn to dry is the hardest part of dyeing.

Bonus for today: I didn’t spill anything or set anything on fire.  Any dyeing day that doesn’t warrant a call for hazmat clean up is a good one!

Chantefable : Starting with a blank page

20160211_142458

Dyeing yarn starts with a blank page.  Here’s a pile of works in progress.  At the center is a superfine merino worsted weight. Underneath is some merino/camel fingering weight and a superwash merino/nylon sock yarn.  So many choices!

Many folks take inspiration from scenery and photos.  My inspiration comes from the images created by storytellers and folk singers.  Today, I am designing a yarn inspired by the incredibly talented folksinger and storyteller, Gordon Bok and his chantefable, Peter Kagan and the Wind. In a chantefable, the storyteller intermixes the spoken word, singing and music to tell a tale.

Peter Kagan and the Wind is a beautiful song about a fisherman, the love of his selchie wife, and a battle with the elements.  If you’d like to hear it, here’s a link to a youTube video

Peter Kagan and the Wind Video

Peter Kagan is a fisherman who lives on the North Atlantic.  His wife is a selchie, a shapechanger who can move between seal and human form.

The folklore about selchies varies.   In some stories, the seal sheds her skin and comes to dance on shore in human form.  If a man steals the skin and keeps it hidden, she will stay with him until she can steal it back.  In others, love-starved women cry tears into the sea to call Selchie men to them.  No matter what their sex, the selchies are always beautiful and beguiling.  In Mr. Bok’s story, Peter’s wife is kind, and they are happy together.  When Peter Kagan put out to sea, she would keep watch and call him home if the danger was coming.

In Peter Kagan and the Wind, Peter heads out to fish the North Atlantic despite his wife’s warning that a storm is coming.  The day begins well, but the storm comes in.  The song becomes a duel between Kagan and Wind.  The Wind fights to take the Kagan and the boat into the sea.  With the help of his Sail,  Kagan uses all of his sailor’s skills to get home. The wind can’t beat Kagan by trickery, so at last

“The Wind brings ice and snow.  The wind blows long and long and black.”

Kagan is forced to curl in the hull of the dory with the Sail wrapped around him, trying to stay warm.  He is dying.  As Kagan lies dying, he dreams of his wife coming to him.

Down the smoking, storming sea she came.

Over the rail of the dory she came, laughing to his arms.

And all in the night and in the storm they did lay,

and the Wind went away, and the storm went away, and in the morning they found him…

…asleep, with a sail wrapped around him.

And there was a seal, lying there with him, curled over him like a blanket,

and the snow was upon the seal’s back.


Building a yarn is about putting together the phrases and images left by the story.

What weight yarn?  What style of dyeing? And finally, what colors?  In this case, everything came together.  A thicker yarn that could be used for warm hats or a sweater.  Ice & snow dyeing because- well, ice & snow & dying are right there in the story.  Snow dyeing will also give a wonderful blend of colors that mirrors light pulling colors into the darker water.  I’d like to capture the ghostly quality of a winter sea- the shadows and unexpected pockets of light.

In the song, there is a wonderful phrase:  The wind blows long and long and black.
I see the black wind on the Atlantic with edges of icy grey pulling across the top of a smoky blue and green sea with silvery spume breaking from the tops of the waves.

So, there are my colors:  black, silver, green and blue

Technique: Ice/snow dyeing

Base: worsted weight merino.  Superfine because seals look so soft and slick in when they swim.

Tomorrow will be all about testing the colors to find the cold greens and blues of the North Atlantic.


.

Every project has a story to tell


20150705_210716

Picking a name for a yarn design business was difficult.  Which way to go?  Cute, Serious, Funny?

I love making yarn, but my first, truest and deepest love (outside of my family) is storytelling.  I love mythology, folklore, fiction, and poetry.  As I thought about the various things we make from yarn, I realized every project is steeped in stories.   From picking the fibers and colors through finishing of ends, the project becomes part of our lives.  When we finish it,we share more than the finished piece.  We share the story of making it.

Our projects tell of people getting married, taking vacations, having babies and fighting illness.  Works in progress reflect our movement through the world. Love them, hate them, wish they would magically complete themselves, our projects embody the stories we tell ourselves when then the snow is knee deep or we have hours to kill at the DMV.  Romance, zombie apocalypses, zeppelins, space ships, aliens, murder, intrigue or courtroom drama.  It all comes out in the patterns and yarn.

This blog is a mash up of book and song recommendations, yarn design, mythology, folklore, and how-to stories.  The how-to stories will share my techniques and well as the ups and downs as I process, dye and use fiber.